Skill level: Intermediate (read more about skill levels of knitting patterns here)
Time: varies, but about 6 to 10 hours
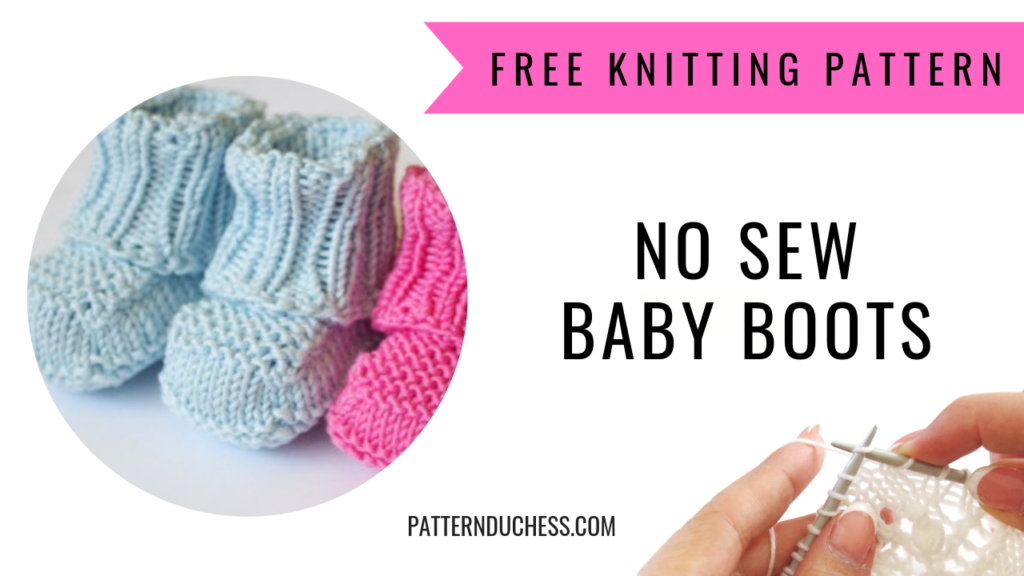
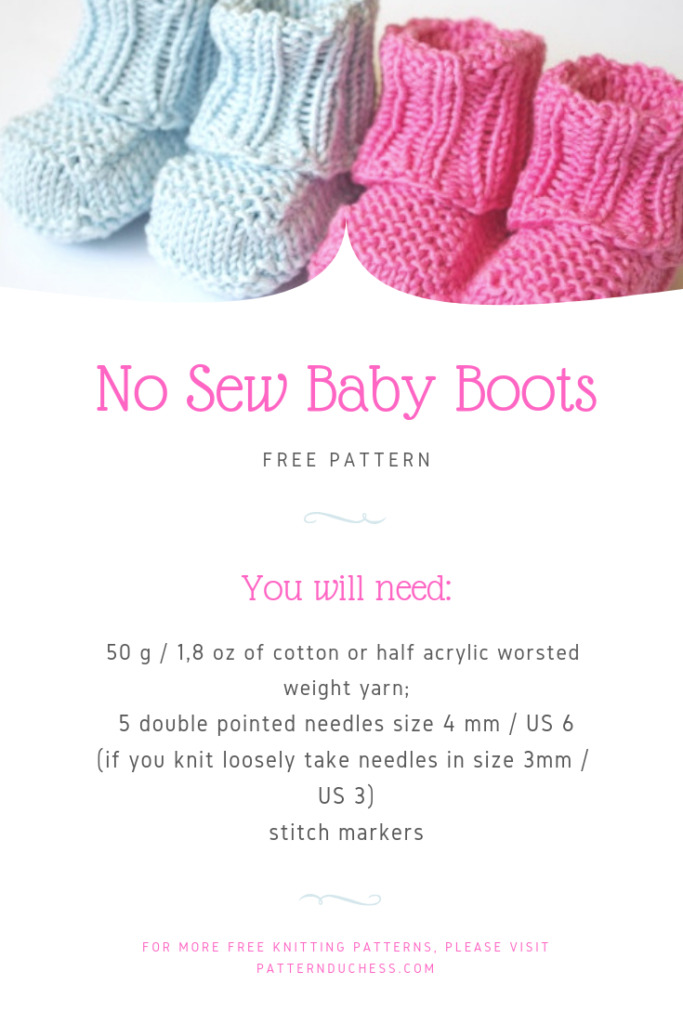
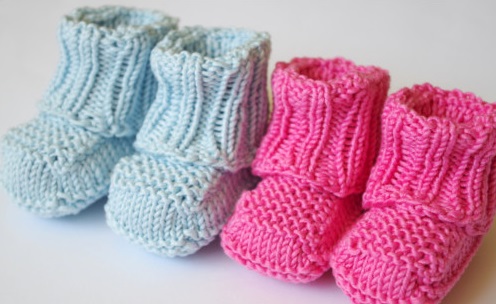
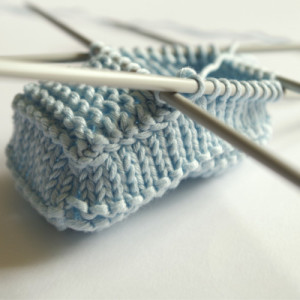
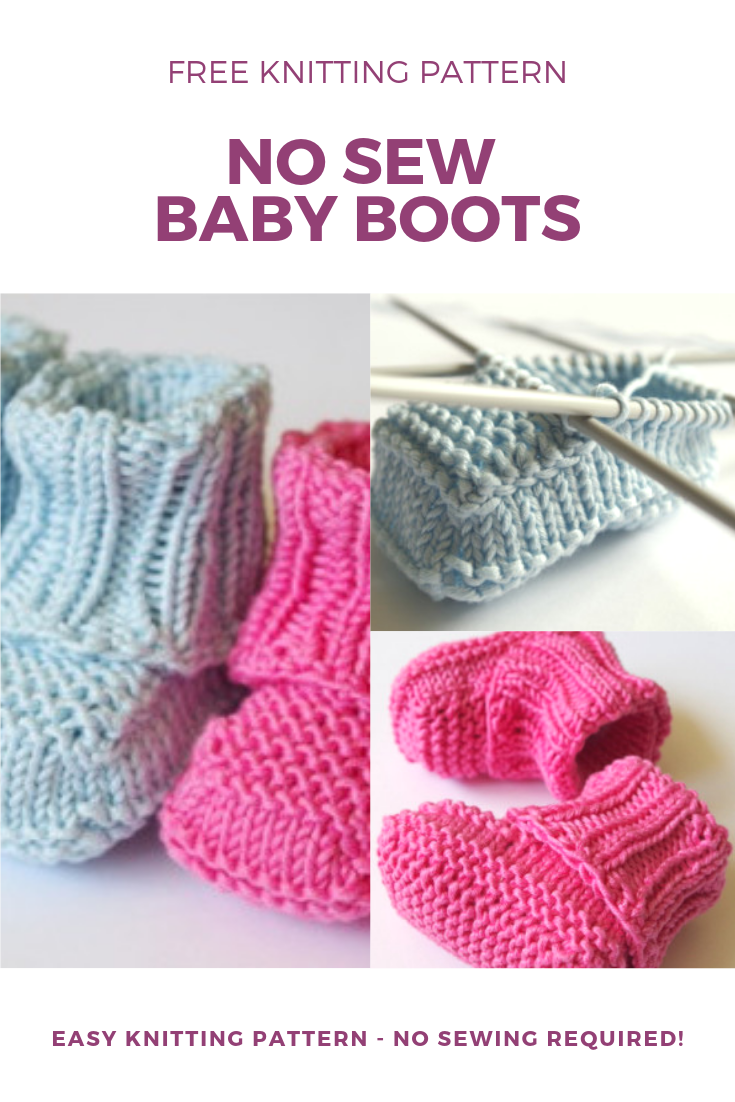
This baby booties pattern is simple, quick and won’t require any sewing (except hiding in yarn ends). I don’t know about you, but I hate sewing… a lot… Usually, I avoid knitting projects with major sewing (I like sewing, but not knitting and sewing together).
Now, no sewing is a good side of the story. Here comes the bad side - you have to pick up stitches. I know, some people hate it even more than sewing. If this is your kryptonite then this pattern is not for you and I’m so sorry for that.
I didn’t make mine with ribbons etc. I prefer baby stuff without them. But no worries - you can make your baby boots in any way you like.
The pattern is for two sizes: 0 - 3 months old baby and 3 - 6 months old baby. The design is quite flexible and stretchy because children are different and grow quickly. Perfect for a baby gift you know 🙂
Get the printer friendly pattern here:
You’ll need:
- 50 g / 1,8 oz of cotton or half acrylic worsted weight yarn;
- 5 double pointed needles size 4 mm / US 6 (if you know that you knit loosely, then I recommend you to take smaller needles in size 3 mm / US 3);
- stitch markers (not obligatory, but might be helpful for marking the beginning of the round)

Abbreviations:
- k – knit;
- sl st – slip stitch;
- M1R – make 1 new stitch (right-leaning);
- M1L – make 1 new stitch (left-leaning);
- ssk – slip, slip, knit together;
- k2tog – knit 2 stitches together
- p – purl;
- w&t – wrap and turn (don’t pick up wrapped stitch if not noted);
- when you see this: Rnds 4 – 5 [4 – 7] then note that Rnds 4-5 would be rounds for 0 to 3 months old baby and Rnds 4-7 would be rounds for 3 to 6 months old baby.
Cast on 6 stitches.
*Knit back and forth*
Row 1: k to end (k all sts);
Row 2: Sl 1st st, k1, M1R, k2, M1L, k2;
Row 3: Sl 1st st, k to end;
Row 4: Sl 1st st, k2, M1R, k2, M1L, k3;
K 30 rows (sl 1st st of each row).
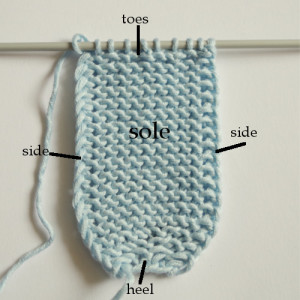
Sl 1st st, k1, ssk, k2, k2tog, k2; (in this pattern – this would be the “toe” needle with 8 sts)
Don’t turn: (with second needle) pick up 17 sts from one side (this would be “side” needle), (with third needle) 6 sts from the heel (this would be “heel” needle) (with fourth needle) 17 sts from other side (this would be “side” needle).
*Knit in rounds*
Place marker if you think you may mix up your rounds.
Rnd 1: p;
Rnd 2: k;
Rnd 3: p;
Rnds 4 – 5 [4 – 7]: k;
Rnd 6 [8]: k to last st;
*Knit back and forth again, turning where noted*
Short instructions:
Row 1: ssk, k6, k2tog, w&t;
Row 2: k9, w&t;
Row 3: ssk, k6, k2tog, w&t;
Repeat rows 2 & 3 total of 6 times.
Longer instructions for this part:
- Slip last stitch from “side” needle onto next needle (“toe” needle)
- Row 1: ssk, k6 – now you have to k2tog, but you have 1 st on this needle, slip 1 stitch from next “side” needle onto “toe” needle – k2tog, wrap & turn (you’ll be wrapping a stitch from “side” needle)
- Row 2: k9 – only you have 8 sts on your “toe” needle, knit those 8 sts and 1 st from “side” needle – w&t;
- Row 3: repeat row 1 as before;
*Knit in rounds again*

Rnd 1: k9, w&t, ssk, k6, k2tog, k24 (k last st together with the wrapped yarn from beginning);
Rnd 2: k;
Rnd 3: p;
Rnd 4: k; (*YO, k2tog* to end of rnd – if you want to use ribbon etc)
Rnd 5: p;
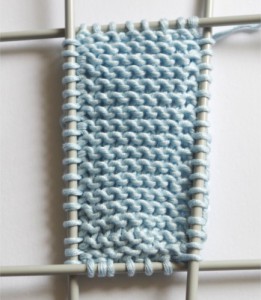
Rnd 6 – 13: *k1, p1* to end of rnd;
Rnd 14: k;
Rnd 15: p;
Rnd 16: k, w&t;
Rnd 17: *k2, p2* to end of rnd (p last st together with the wrapped yarn from last round);
Rnds 18 – 32: *k2, p2* to end of rnd;
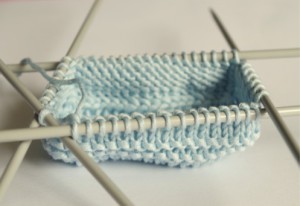
Cast off and hide the yarn ends.
Marny CA
15 Jun 2015Is this the LAST row of this gorgeous bootie:
Rnds 18 – 32: *k2, p2* to end of rnd;
A ; (semi-colon at the end of this “last” row seems to me to be showing something to follow)
I’m hoping to make a these (never actually made anything using dpns) for my friend’s first great-grandchild. Blue, of course.
These are really cool!
PatternDuchess
15 Jun 2015Yes, this is the last thing to do. I’m sorry, I should have stated this. I’m fixing this now. Thank you for asking 🙂
Linus Blanketeer
4 Mar 2016I don’t understand Round 16. Is it actually worked as a row with a turn at the end and then back to the round at the end of 17?
PatternDuchess
4 Mar 2016You need to make wrap & turn in the end of round 16
Helen Crow
5 Mar 2016I apologize for being so dense but . . . what I did last evening was
1. Knit round 16, w&t at the end. I did the w&t on the first stitch on the next needle.
2. Then I followed the pattern in the reverse direction on round (row) 17 back to the wrap.
3. I worked the wrapped stitch and then continued on in the round - working on the inside until I got to the bind off.
While this seemed a little awkward it did work. Is that the correct interpretation. After the fact, it occured to me to turn the bootie inside out to make it a little less awkward.
It is an awfully cute bootie. Thank you.
PatternDuchess
6 Mar 2016Sorry about my deleyed answer - I’m still recovering my illness. Yes, you got that right - I should have specified that in the pattern 🙂
Helen Crow
7 Mar 2016Feel better
Shari Richardson
5 Mar 2016I’m a bit confused on the w & t. Which st am I wrapping, the k2tog or adding the st from the side needle then wrapping that one?
Goarrin
5 Jul 2017in french ?
PatternDuchess
5 Jul 2017I don’t speak french 🙂
Vanessa
30 Oct 2017I’m nearly done my first bootie and am so happy to have found a no-sew pattern. I’m working on the last set of 32 rounds. Based on the image included in the pattern, it looks like I should be going straight from Rnd 1 to Rnd 6… meaning that I don’t see the four rounds of garter stitch (Rnd 2-5) before the start of the ribbed cuff. Are the image and pattern different? What am I missing?
PatternDuchess
30 Oct 2017Hi Vanessa, I’m not sure, but I can see those garter stitch rounds. I hope we are talking about the same picture 🙂 There will be 4 rounds of garter stitch starting from round 2. Maybe it’s not that clear on the picture.
Emil
14 Nov 2017Liked very much and easy
Lisa
1 Feb 2018Thank you for the pattern! I am confused here: Rnd 6 [8]: k to last st;
Is this just another complete round of knitting? I’m unsure why it wasn’t just included in the line above so I’m second guessing.
Thank you.
Lisa
1 Feb 2018I see this is explained in the following text!please disregard my question.
PatternDuchess
1 Feb 2018Oh good, I’m glad you got this. I didn’t know how to explain it. 🙂
Nancy
23 Mar 2018Sorry, but I don’t understand this part. Do you work that last stitch?I’m confused. Could you explain it? Thank you.
PatternDuchess
23 Mar 2018Hi Nancy, which part don’t you understand?
Lana
11 May 2018Thank you for the beautiful booties. I really like how you put the instructions then a video to explain how to do it. This is really helpful. I like to read pattern first to give me an idea then watch video. Very impressed with your teqnique. Thank again
PatternDuchess
11 May 2018Thank you, Lana!
Sylvia
5 Sep 2018I would like to make these and wonder if you have a printable pattern as a pdf? I like to work from paper, not my computer screen…more portable LOL
PatternDuchess
7 Sep 2018Hi Sylvia, I don’t have a printable (yet), but I consider making one. Until then, you could copy the instructions into some kind of word processor in your computer (Word, Notes, Notepad or any other). This way you could easily print it.