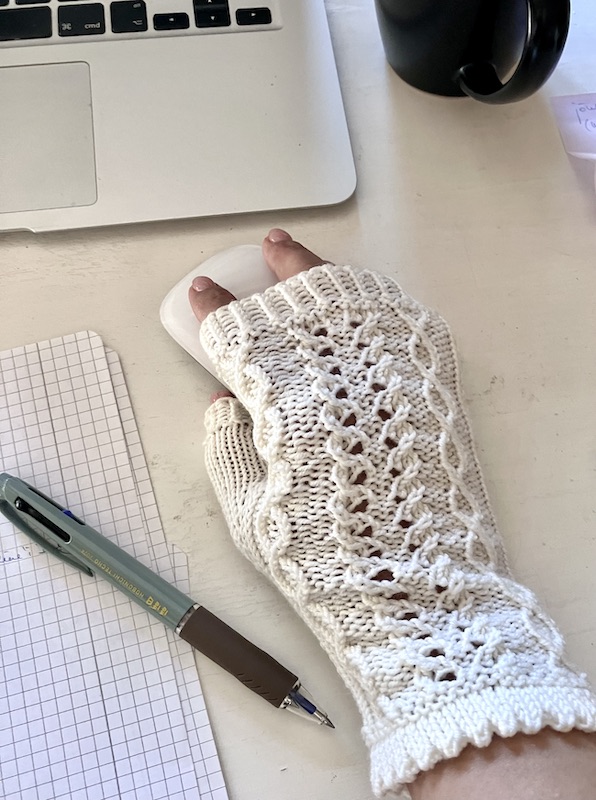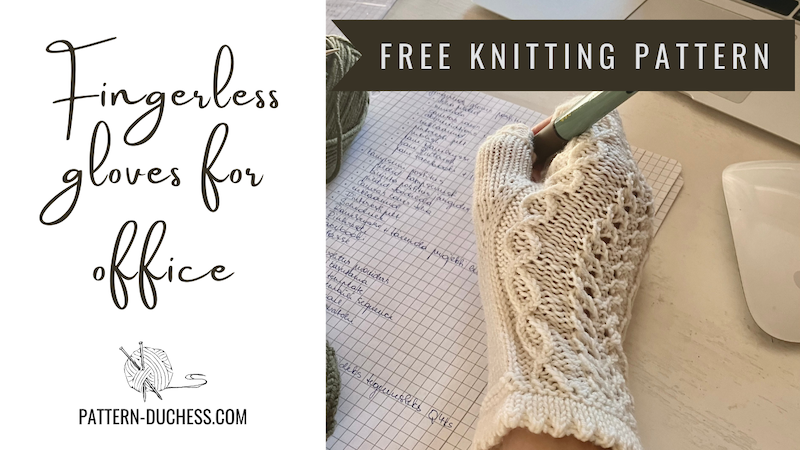
Keep your hands warm with this free knitting pattern for fingerless gloves
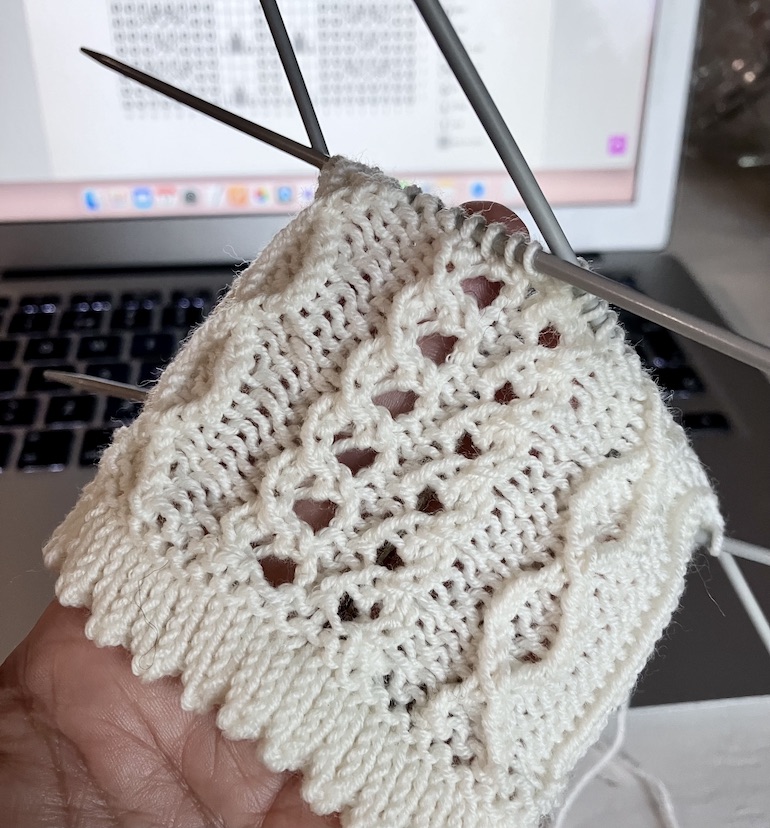
As the cooler temperatures find their way into our office spaces, maintaining warm hands while typing can often be a struggle. Fingerless gloves are the perfect solution. This knitting pattern is tailored for intermediate knitters or adventurous beginners familiar with knitting in rounds as the charming easy cablework and interesting lace details add a touch of elegance to your office attire.
I used 100% merino wool using DROPS Baby Merino yarn, and these gloves are both cozy and functional. You’ll need a basic set of tools—5 double-pointed needles size 3mm / US 2.5, stitch markers, a stitch holder or scrap yarn, and a cable needle—to embark on this project. Although I completed my pair in about 6 hours, the time may vary based on your knitting speed and experience.
Whether you’re looking to enhance your office wardrobe or simply keep your hands warm as you work, this pattern provides detailed instructions to guide you through each step. Ready to start knitting? Let’s go!
YOU’LL NEED
- Set of 5 double-pointed needles size 3mm / US 2,5
- 2 stitch markers
- Stitch holder or scrap yarn
- Cable needle
- 100 g / 3.52 oz of fine yarn or sock yarn – I used 100% merino wool
„DROPS Baby Merino“ 50g (1.76oz) = approx 175m (191 yards)
SIZE (circumference of the hand)
- S: 17 cm (6, 5 in)
- M: 19 cm (7,5 in)
- L: 21 cm (8, 5 in)
GAUGE
10 x10 cm ( x ) = 24 sts x 32 rows
ABBREVIATIONS
- rnd(s) – round(s);
- st(s) – stitch(es);
- cn - cable needle;
- rep - repeat;
- k – knit;
- p – purl;
- YO – yarn over;
- k2tog – knit 2 together;
- ssk – slip, slip, knit slipped stitches together;
- k3tog – knit 3 together;
- sssk – slip, slip, slip, knit slipped stitches together;
- k tbl - knit 1 stitch through the back loop;
- 1/1 RT - slip 1 stitch to the cable needle and hold in back, knit 1 stitch from the left needle, knit stitch from the cable needle;
- 1/1 LT - slip 1 stitch to the cable needle and hold in front, knit 1 stitch from the left needle, knit stitch from the cable needle;
- PM - place marker;
- SM - slip marker;
- M1L - make 1 stitch slanting to left;
- M1R - make 1 stitch slanting to right;
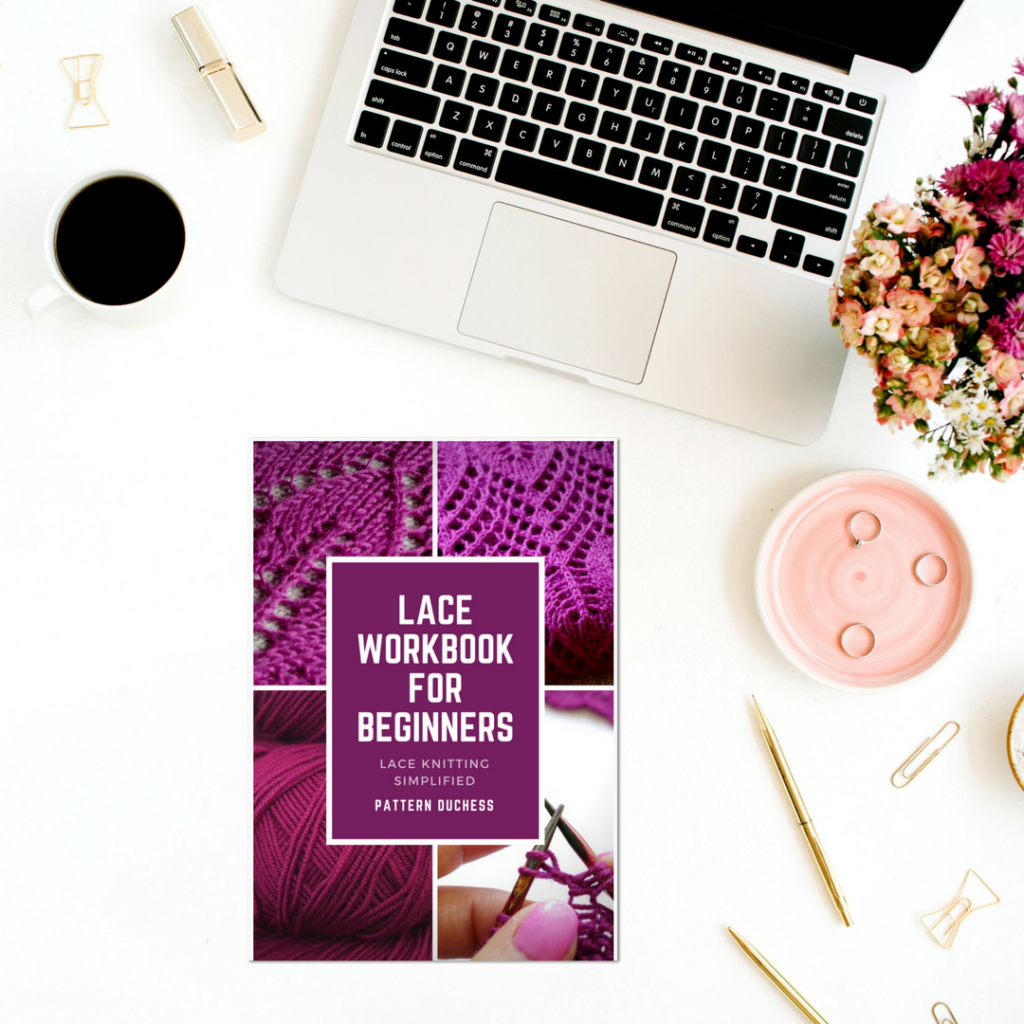
LACE KNITTING WORKBOOK FOR (ABSOLUTE) BEGINNERS
Lace Knitting Workbook for Beginners will take away the complexity and give you everything simplified. It will show you what tools you will need, how to easily choose the yarn and needles, and give you tips on how to save money on most of it.
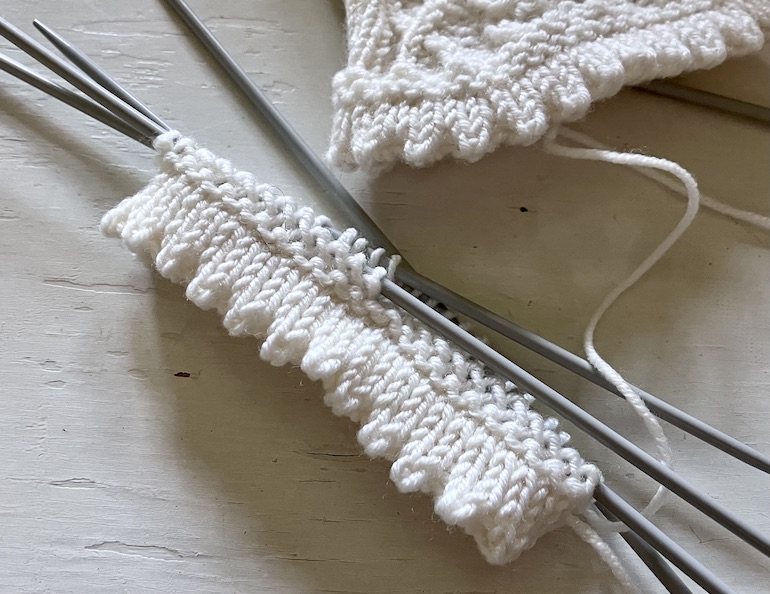
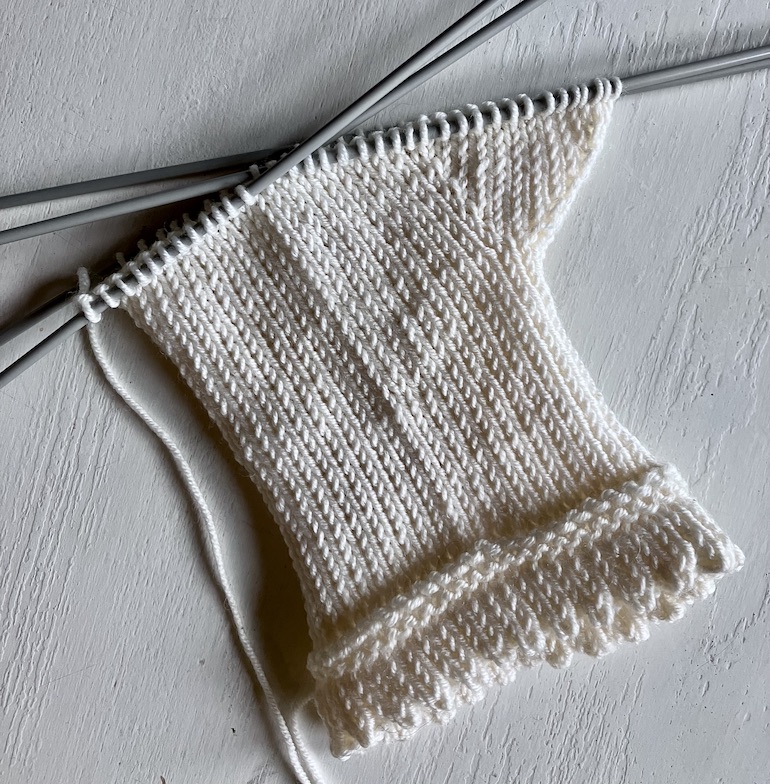
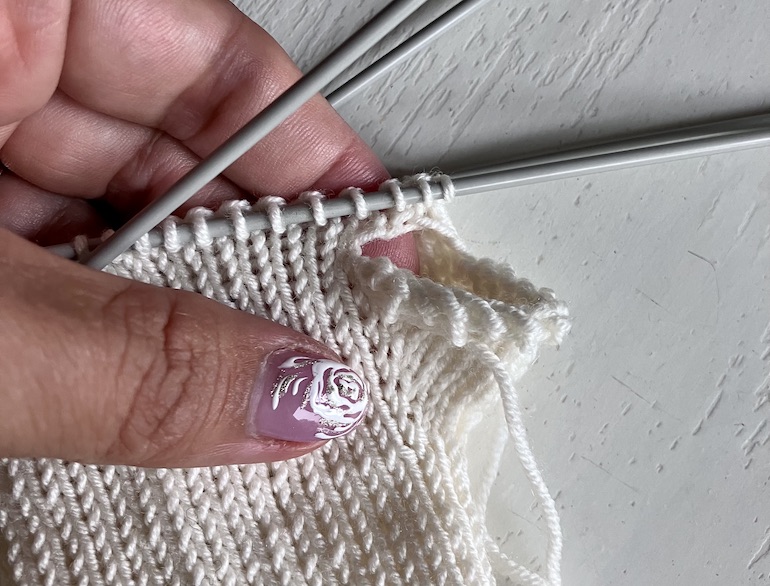
CUFF
Cast on 48 (56; 64) stitches and join to form the round. Divide stitches evenly between 4 needles.
Rnd 1-5: k;
Rnd 6: *YO, k2tog; rep from* to end;
Rnd 7-11: k;
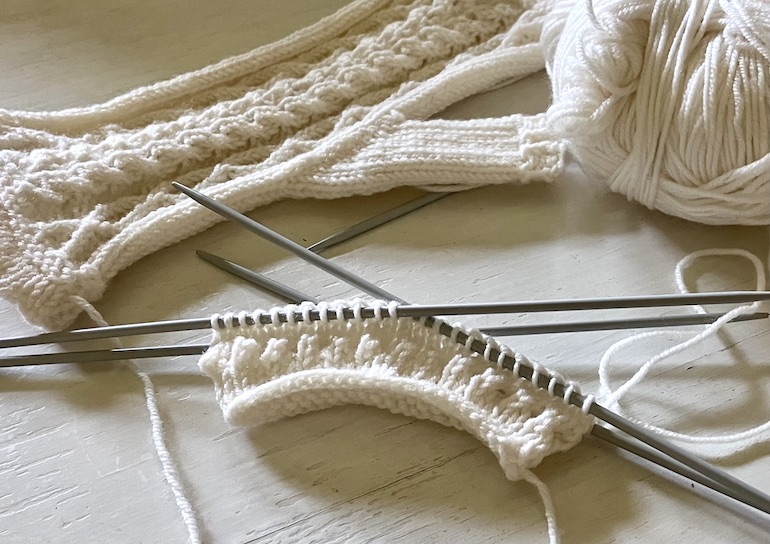
Turning the edge (you can skip this step and just sew the edge inside later on).
Fold the lower edge of the cuff inside so that rnd 6 will be a new lower edge. Knit stitches of rnd 11 and cast on stitches together – With a right-hand needle, pick up the first stitch of cast on rnd and slip on the left-hand needle. Knit 1st stitch of rnd 11 and slipped stitch of cast on rnd together. Now pick up 2nd stitch of cast on rnd and slip on the left-hand needle – knit this and 2nd stitch of rnd 11 together. And so on.

Rnd 12: p;
Rnd 13: p;
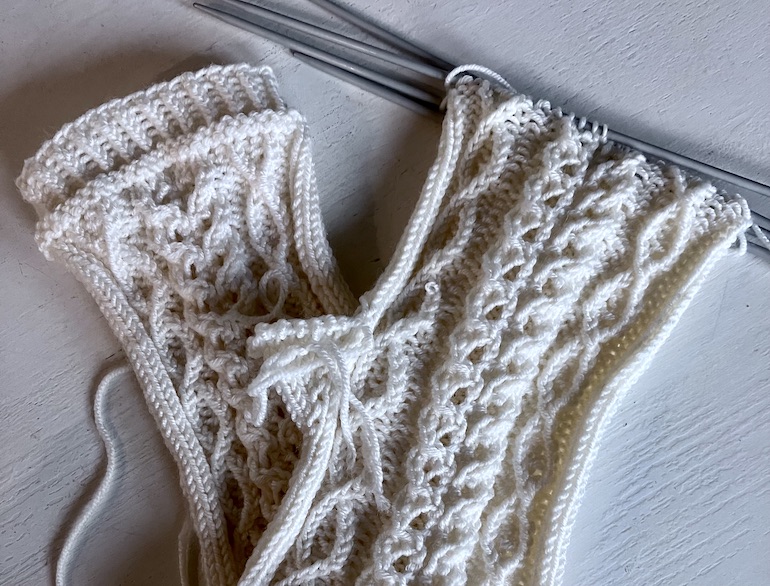
Start with the pattern
Make 3 pattern repeats and start with gusset increases.
NOTE!
You will be knitting the pattern only on the first 2 needles - the other two needles will be just knit stitches.
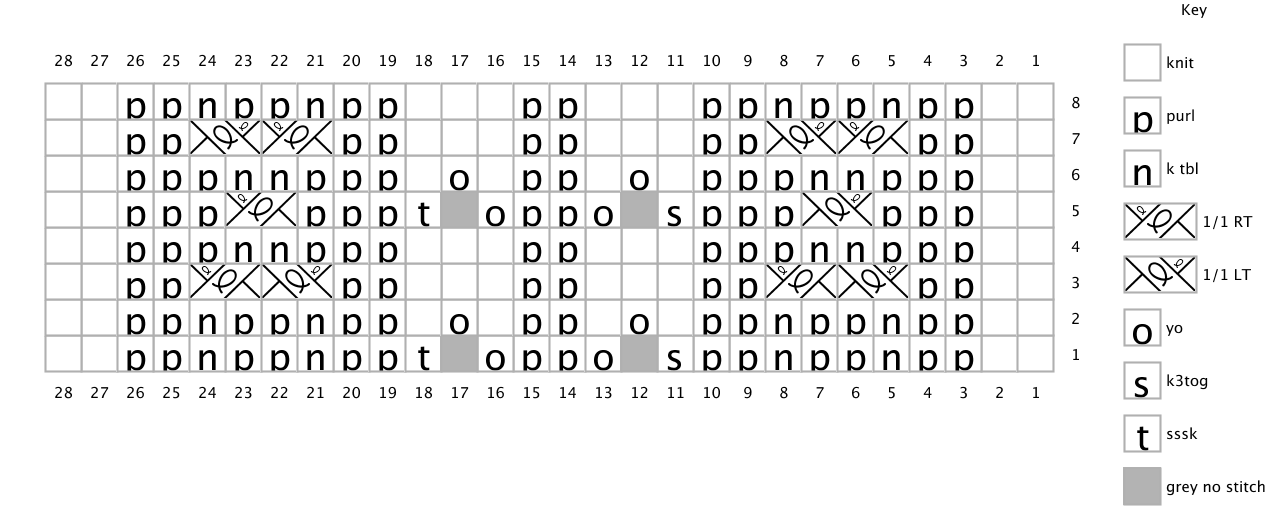
Fingerless gloves size S
Round 1: (P2, k1 tbl) x 2, p2, k3tog, yo, p2, yo, sssk, (p2, k1 tbl) x 2, p2.
Round 2: (P2, k1 tbl) x 2, (p2, k1, yo, k1) x 2, (p2, k1 tbl) x 2, p2.
Round 3: P2, 1/1 LT, 1/1 RT, (p2, k3) x 2, p2, 1/1 LT, 1/1 RT, p2.
Round 4: P3, k1 tbl x 2, p3, k3, p2, k3, p3, k1 tbl x 2, p3.
Round 5: P3, 1/1 LT, p3, k3tog, yo, p2, yo, sssk, p3, 1/1 RT, p3.
Round 6: P3, k1 tbl x 2, p3, k1, yo, k1, p2, k1, yo, k1, p3, k1 tbl x 2, p3.
Round 7: P2, 1/1 RT, 1/1 LT, (p2, k3) x 2, p2, 1/1 RT, 1/1 LT, p2.
Round 8: (P2, k1 tbl) x 2, (p2, k3) x 2, (p2, k1 tbl) x 2, p2.

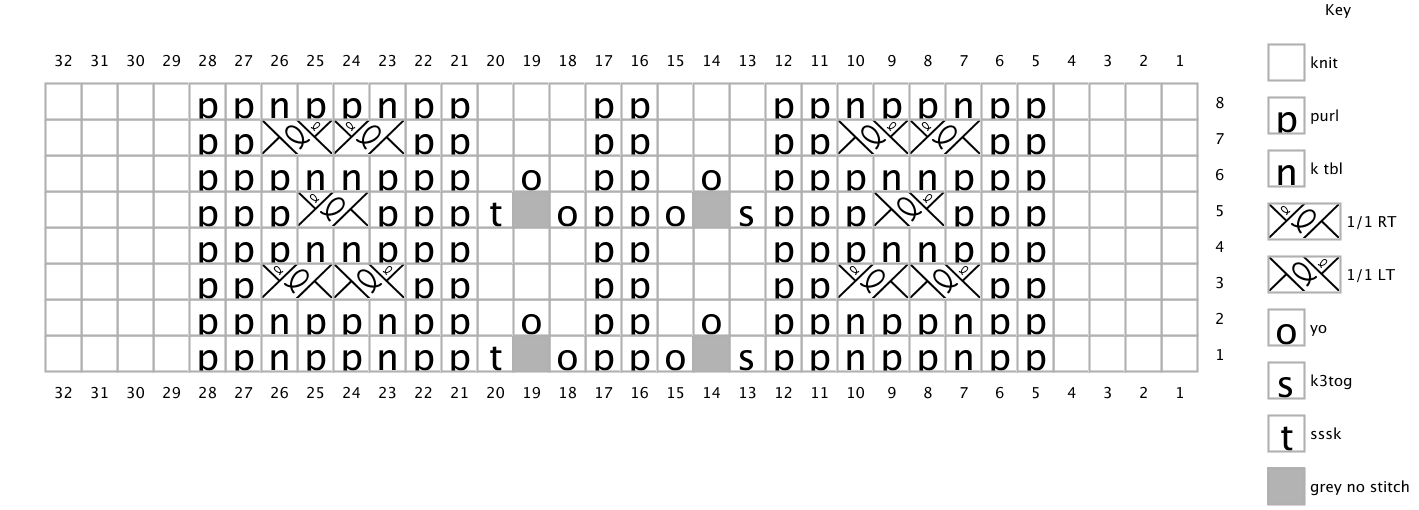
Fingerless gloves size M
Round 1: K2, (p2, k1 tbl) x 2, p2, k3tog, yo, p2, yo, sssk, (p2, k1 tbl) x 2, p2, k2.
Round 2: K2, (p2, k1 tbl) x 2, (p2, k1, yo, k1) x 2, (p2, k1 tbl) x 2, p2, k2.
Round 3: K2, p2, 1/1 LT, 1/1 RT, (p2, k3) x 2, p2, 1/1 LT, 1/1 RT, p2, k2.
Round 4: K2, p3, k1 tbl x 2, p3, k3, p2, k3, p3, k1 tbl x 2, p3, k2.
Round 5: K2, p3, 1/1 LT, p3, k3tog, yo, p2, yo, sssk, p3, 1/1 RT, p3, k2.
Round 6: K2, p3, k1 tbl x 2, p3, k1, yo, k1, p2, k1, yo, k1, p3, k1 tbl x 2, p3, k2.
Round 7: K2, p2, 1/1 RT, 1/1 LT, (p2, k3) x 2, p2, 1/1 RT, 1/1 LT, p2, k2.
Round 8: K2, (p2, k1 tbl) x 2, (p2, k3) x 2, (p2, k1 tbl) x 2, p2, k2.
Fingerless gloves size L
Round 1: K4, (p2, k1 tbl) x 2, p2, k3tog, yo, p2, yo, sssk, (p2, k1 tbl) x 2, p2, k4.
Round 2: K4, (p2, k1 tbl) x 2, (p2, k1, yo, k1) x 2, (p2, k1 tbl) x 2, p2, k4.
Round 3: K4, p2, 1/1 LT, 1/1 RT, (p2, k3) x 2, p2, 1/1 LT, 1/1 RT, p2, k4.
Round 4: K4, p3, k1 tbl x 2, p3, k3, p2, k3, p3, k1 tbl x 2, p3, k4.
Round 5: K4, p3, 1/1 LT, p3, k3tog, yo, p2, yo, sssk, p3, 1/1 RT, p3, k4.
Round 6: K4, p3, k1 tbl x 2, p3, k1, yo, k1, p2, k1, yo, k1, p3, k1 tbl x 2, p3, k4.
Round 7: K4, p2, 1/1 RT, 1/1 LT, (p2, k3) x 2, p2, 1/1 RT, 1/1 LT, p2, k4.
Round 8: K4, (p2, k1 tbl) x 2, (p2, k3) x 2, (p2, k1 tbl) x 2, p2, k4.
GUSSET
While continuing the pattern on the first 2 needles, start increasing according to which hand glove you are knitting. Each increase round adds 2 stitches to the gusset (number of knit stitches between markers).
Between each increase round will be a knitting round. NO INCREASES are made on that round.
After the gusset increases you will have:
Size S: 13 stitches between the markers (total of 6 increase rounds);
Size M: 15 stitches between the markers (total of 7 increase rounds);
Size L: 17 stitches between the markers (total of 8 increase rounds);
LEFT HAND
Increases will be made on the fourth needle (work the first 2 needles following the pattern as before, knit 3rd needle, and start increasing on 4th needle).
- k to last 3 sts, PM, M1R, k1, M1L, PM, k2;
- k;
- k to marker, SM, M1R, k3, M1L, SM, k2;
- k;
- k to marker, SM, M1R, k5, M1L, SM, k2;
- k;
- k to marker, SM, M1R, k7, M1L, SM, k2;
- k;
- k to marker, SM, M1R, k9, M1L, SM k2;
- k;
- k to marker, SM, M1R, k11, M1L, SM, k2;
- Size S only: k to marker, slip 13 sts on stitch holder, cast on 1, k2; -> move on with the next part
Size M & L: k; - Sizes M & L: k to marker, SM, M1R, k13, M1L, SM, k2;
- Size M only: k to marker, slip 15 sts on stitch holder, cast on 1, k2; -> move on with the next part
Size L: k; - Size L: k to marker, SM, M1R, k15, M1L, SM, k2;
- k to marker, slip 17 sts on stitch holder, cast on 1, k2; -> move on with the next part
RIGHT HAND
Increases will be made on the third needle (work the first 2 needles following the pattern as before, start increasing on the 3rd needle, and knit the 4th needle).
- k2, PM, M1R, k1, M1L, PM, k to end;
- k;
- k2, SM, M1R, k3, M1L, SM, k to end;
- k;
- k2, SM, M1R, k5, M1L, SM, k to end;
- k;
- k2, SM, M1R, k7, M1L, SM, k to end;
- k;
- k2, SM, M1R, k9, M1L, SM, k to end;
- k;
- k2, SM, M1R, k11, M1L, SM, k to end;
- Size S only: k2, slip 13 sts on stitch holder, cast on 1, k to end; -> move on with the next part
Sizes M & L: k; - Sizes M & L: K2, SM, M1R, k13, M1L, SM, k to end
- Size M only: k2, slip 15 sts on stitch holder, cast on 1, k to end; -> move on with the next part
Size L: k; - Size L: K2, SM, M1R, k15, M1L, SM, k to end
- k2, slip 17 sts on stitch holder, cast on 1, k to end; -> move on with the next part
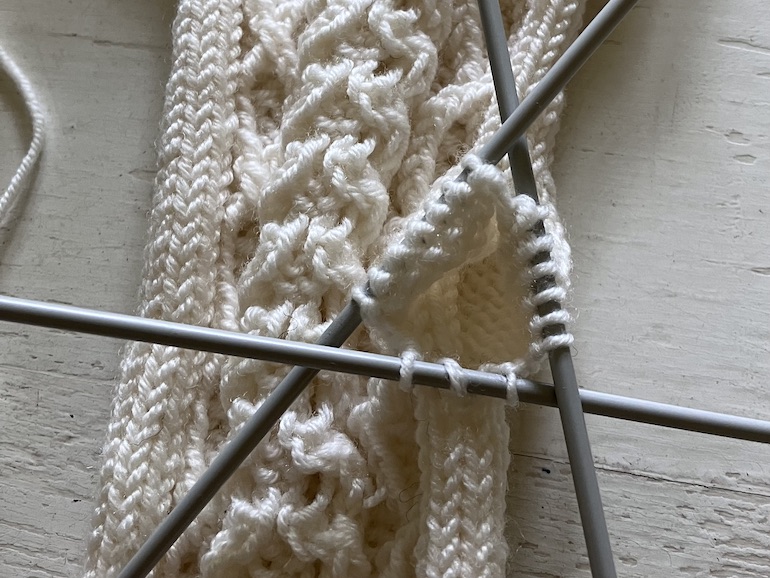
PALM
Continue working the pattern on the first 2 needles and just knit the other two needles until you have about 1,5 - 2 cm from the end of the little finger. For me, it was 3 pattern repeats.
FINISHING
- Rnds 1 - 2: p;
- Rnds 3 - 7: *k1 tbl, p1* rep to end of rnd;
Cast off loosely.
THUMB
Place 13 (15; 17) gusset stitches from the stitch holder back on the needles (divide between two needles).
Pick up 3 stitches from the place where you made the thumb hole cast-on stitch (1 stitch before cast-on stitch, cast-on stitch, and 1 stitch after cast-on stitch). Don’t worry if you have a hole in the connecting round. You can sew it together in the finishing phase. OR you could pick up more stitches and decrease those on the next round.
- k 12 (16;20) rounds;
- p 1 round;
- Size S: 5 rounds of (p1, k tbl)
Size M: 9 rounds of (p1, k tbl)
Size L: 13 rounds of (p1, k tbl)
Cast off loosely.
FINISHING
Hide yarn ends and if you have little holes at the beginning of the thumb, sew those too.