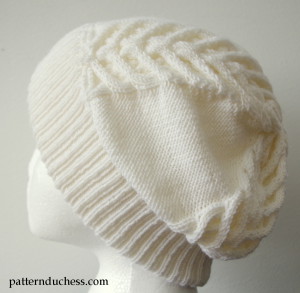
The slouchy beanie hat is “in” this winter. And naturally, I needed one for the exact same reason. We’re planning to go to Latvia to learn snowboarding. And I need a modern hat for that because I can’t fall down with an old hat. Weird, I know.
I wanted it to be soft and warm, knitted, with wide brim and cables. And white.
I thought about whether I will give you the pattern for free or put it on my Etsy shop… And as long as my Etsy shop is mostly sold out anyway then there is no point of getting it stocked now 🙂
This hat pattern is for heads starting at the circumference of 52 cm (20,5 inches). Because it is a slouchy hat then it will easily go for bigger heads than mine. I seem to have a fairly small head. And hands. But that’s not the point.
Also, you can use circular needles instead of double pointed ones, but use a marker at the beginning of the round then.
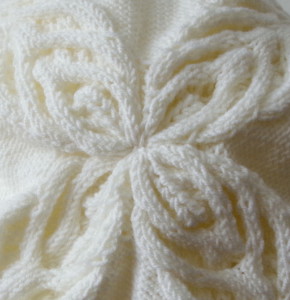
Enjoy!
You will need:
- 5 double pointed needles size 2 mm (US 0)
- 5 double pointed needles size 4 mm (US 6)
- cable needle
- tapestry needle
- 150 g (1,76 oz) [approx 175 m (191 yds)] of baby weight yarn - I used 3 balls of white DROPS Baby Merino (100% wool)
If you can’t find DROPS Baby Merino yarn then second best and ideal for this pattern is this Malabrigo Lace Baby Merino. Very nice and luxurious.
Gauge: 10×10 (4″x4″) = 24 sts x 32 rows
Abbreviations
rnd(s) – round(s)
rep – repeat
sts – stitches
cn – cable needle
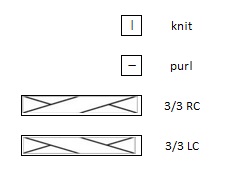
k – knit
p – purl
YO – yarn over
k2tog – knit 2 together
ssk – slip, slip, knit together
3/3 RC – slip the next 3 sts onto a cn and hold back, k3 from left-hand needle, then knit the 3 sts from cable needle
3/3 LC - slip the next 3 sts onto a cn and hold front, k3 from left-hand needle, then knit the 3 sts from cable needle
Knitting the brim:
Start with 2 mm needles.
Cast on 212 stitches and divide between 4 needles (53 stitches on one needle).
Rnds 1 – 30: *k2,p2* rep to end;
Rnd 31: *YO, k2tog, p2* rep to end;
Rnd 32 – 62:*k2,p2* rep to end;
At this point I turned the edge so that rnd 31 was now lower edge and knitted rnd 1 and rnd 63 together. You can sew it afterwards or just leave it. Whatever works for you.
Rnd 63: k;
Rnd 64: p;
Rnd 65: k;
Rnd 66: p;
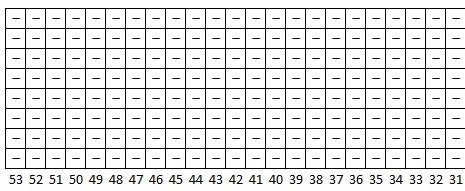
Change the needles to bigger ones and continue with the pattern. You can follow the written instructions or use charts. If you use charts, make sure you start with 1A and then 1B (these are actually one big pattern) - these would be one pattern repeat and you repeat these in total of 4 times.
Cable pattern:
Rnd 1: *k9, 3/3 RC, 3/3 LC, k9, p23* rep to end;
Rnd 2: *k30, p23* rep to end;
Rnd 3: *k6, 3/3 RC, k6, 3/3 LC, k6, p23* rep to end;
Rnd 4: *k30, p23* rep to end;
Rnd 5: *k3, 3/3 RC, k12, 3/3 LC, k3, p23* rep to end;
Rnd 6: *k30, p23* rep to end;
Rnd 7: * 3/3 RC, k18, 3/3 LC, p23* rep to end;
Rnd 8: *k30, p23* rep to end;
Repeat rounds 1 – 8 five times total.
Decreasing:
Start decreasing on every other round (on every cable round) knitting first two purl stitches together and last purl stitches together (total of two pattern repeats).
Rnd 1: *k9, 3/3 RC, 3/3 LC, k9, p2tog, p19, p2tog* rep to end;
Rnd 2: *k30, p21* rep to end;
Rnd 3: *k6, 3/3 RC, k6, 3/3 LC, k6, p2tog, p17, p2tog * rep to end;
Rnd 4: *k30, p19* rep to end;
Rnd 5:*k3, 3/3 RC, k12, 3/3 LC, k3, p2tog, p15, p2tog * rep to end;
Rnd 6: *k30, p17* rep to end;
Rnd 7: * 3/3 RC, k18, 3/3 LC, p2tog, p13, p2tog * rep to end;
Rnd 8: *k30, p15* rep to end;
Rnd 9: *k9, 3/3 RC, 3/3 LC, k9, p2tog, p11, p2tog* rep to end;
Rnd 10: *k30, p13* rep to end;
Rnd 11: *k6, 3/3 RC, k6, 3/3 LC, k6, p2tog, p9, p2tog * rep to end;
Rnd 12: *k30, p11* rep to end;
Rnd 13: *k3, 3/3 RC, k12, 3/3 LC, k3, p2tog, p7, p2tog * rep to end;
Rnd 14: *k30, p9* rep to end;
Rnd 15: * 3/3 RC, k18, 3/3 LC, p2tog, p5, p2tog * rep to end;
Rnd 16:*k30, p7* rep to end;
Now start to decrease on every round.
First, decrease the purl stitches like before until you have total on 3 purl stitches on every needle.
Then do the decreases between the cables.
Rnd 17: * k9, 3/3 RC, 3/3 LC, k9, p2tog, p3, p2tog* rep to end;
Rnd 18: *k30, p2tog, p1, p2tog* rep to end;
Rnd 19: *k6, 3/3 RC, k1, ssk, k2tog, k1, 3/3 LC, k6, p3* rep to end;
Rnd 20: *k12, ssk, k2tog, k12, p3* rep to end;
Rnd 21: *k3, 3/3 RC, k2, ssk, k2tog, k2 , 3/3 LC, k3, p3* rep to end;
Rnd 22: *k10, ssk, k2tog, k10, p3* rep to end;
Rnd 23: *3/3 RC, k3 , ssk, k2tog, k3 , 3/3 LC, p3* rep to end;
Rnd 24: *k8, ssk, k2tog, k8, p3* rep to end;
Rnd 25: * k7, ssk, k2tog, k7, p3* rep to end;
Rnd 26: *k6, ssk, k2tog, k6, p3* rep to end;
Rnd 27:*k5, ssk, k2tog, k5, p3* rep to end;
Break yarn leaving big enough tail for sewing.
With tapestry needle, draw yarn through the stitches and through the hole you just formed. Turn the hat inside out, pull the hole together and sew.
I hope you love this slouch hat as much as I do and make sure you show me your outcome.
Happy knitting!
Hi sorry I have a question did you work it in the round
Hi, yes, knit in rounds - I’m sorry I didn’t make it clear. 🙂
Is the indicated gauge with the smaller or larger sized needles used in the pattern?
Hi, it’s for larger size needles. You will be using smaller needles only for ribbing - this way the brim of the hat will hold its form better.
Hi, I’m sorry, but I have a question…I’m doing the pattern on circular needles and wanted to know about the decrease part, you wrote to decrease every cable row, starting with purl 2 and finish with purl 2, so the written pattern would be p2tog * k9, 3/3 rc, 3/3 lc, and so on, until the last 2sts, then p2tog. ?? Sorry, i don’t know if I’m making any sense haha.
Thank you!!!
I get your question. What I meant is: if you look at the pattern, there are two sections - cable section (eg. 3/3 RC, k18, 3/3 LC) and just purl stitches section (eg. p23). I meant decreases of the purl section.
So if you look at the written out pattern, first decrease round would be *k9, 3/3 RC, 3/3 LC, k9, p2tog, p19, p2tog* rep to end; - that bold part (p2tog, p19, p2tog) is the purl section of initial “p23” sts.
Just follow written out pattern and you’ll be fine.
I hope it makes sense and so sorry for the confusion 🙂
I don’t understand this statement you wrote what does it mean.
“First, decrease the purl stitches like before until you have total on 3 purl stitches on every needle.”
Like what before? and then there are more stitches to be decreased. How can there be more stitches if your statement is correct? And I’m doing this in the round, so is this step necessary?
Hi Marcella, just follow the written instructions round by round. It’s all written down. 🙂
Beautiful hat! Thank you for generously sharing your pattern.
I am new to hats and cables.
I’m curious why you chose lace weight yarn for a hat, and is it possible to do it in something larger?
TIA
Thank you, Dany! Lace weight yarn is just my preference. You could knit it with sock yarn, for example.